BPEL is a tool used to define web services. We can use it to invoke web service of a certain application or tool and then transform the output of this service into something that can be used by the web service of another tool. The web service of the 2nd tool can then be invoked to get the desired results.
Apart from this, BPEL can be used to define custom web services which can be exposed to multiple applications which intend to do some common task. This not only centralizes the code but also reduces its redundancy.
BPEL has a very important activity called Human Flow. BPEL activities are building block of BPEL composite. For example, there is assign activity to assign one variable to the other. Other examples of activities are Switch (to make decisions), Invoke, Receive etc.
A human flow is an out of the box feature of BPEL that lets you implement the process by which humans work, into the programming language. For example, in most offices we have a process where an attendant transfers a file from one official to the other to get the work done. Human workflow in BPEL can do exactly the same. Once a human workflow is associated to a BPEL process a service called Task Service is generated (It is possible to program various properties of task service as well). This task service has functions like delegate task which can help you move the task from the worklist of one person and assign it to the other. Worklist is another out of the box feature which comes along with Human workflow. Worklist shows various tasks that need a user’s attention. Worklist is a jsp page which resides on the web server, and can be customized if the need be. Other examples of the functions in the Task service are create task, assign task etc. I will try to come up with a different article on invoking BPEL human workflows from APEX.
I intend to dedicate this article to introduce the concept of invoking BPEL processes from APEX
In this article, I will create a BPEL process that will insert some values in a table and I will invoke this BPEL process from APEX
Prerequisites:
1. You will need Jdeveloper installed on your machine.
2. You will also need a server with all the necessary components installed on it.
These include a database, RCU, web server etc
You may use the below link as the 1st step for installation. I am sure there are better
resources available on the net for this
I always had troubles installing this stuff and I was lucky enough to have a ready server where I could run my tests
Let’s get started:
Let’s get started:
Steps to create the 1st BPEL application
1. Open Jdeveloper and click do: File -> New
1. Open Jdeveloper and click do: File -> New
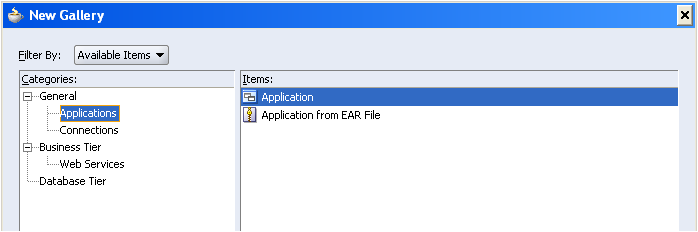
Click on ‘Application’ and click OK button
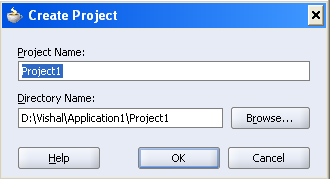
2. Give the directory path where you intend to store your application and do not select any templates as shown
in the figure below. Click on the Ok button
in the figure below. Click on the Ok button

3. A create project popup appears. Click on Cancel button as it does not let you select the type of the project
4. You can now see your new application in the Application navigator

5. Right click the application and click ‘New project’. Select ‘BPEL Process Project’ from the list of items and
click OK
click OK

6. Select ‘Asynchronous BPEL Process’ and click Next

7. Click on finish

8. You will have the following thing in front of you now

Here Client is the external application which will give a web service call. recieveInput activity accepts the input
for your BPEL process and callbaclClient sends the response to the client.BPEL process code lies
between recieveInput and callbackClient
9. Click on 'Components' tab.It brings up the component palette It appears in the rightmost corner of your Jdeveloper

10. Drag an Invoke activity between recieveInput and callbackClient from component palette and put it in the
highlighted circle between the two. Activities are visible under ‘Process Activities’ in the component palette
highlighted circle between the two. Activities are visible under ‘Process Activities’ in the component palette

11. You will see an error on the invoke activity as shown in the figure below. This is because invoke has not
referenced any external service.
referenced any external service.

12. Change the drop down in the component palette to Services from ‘Process Activities’

13. Drag and drop Database adapter in the service region on the right of the work area (The grey area). Do not
drag it all the way to the region where receiveInput is defined
drag it all the way to the region where receiveInput is defined

14. You will see a adapter configuration wizard. Click next and give the name of the service in the following
page.
page.

15. You will be prompted to put your DB connection. Click on the new button next to it
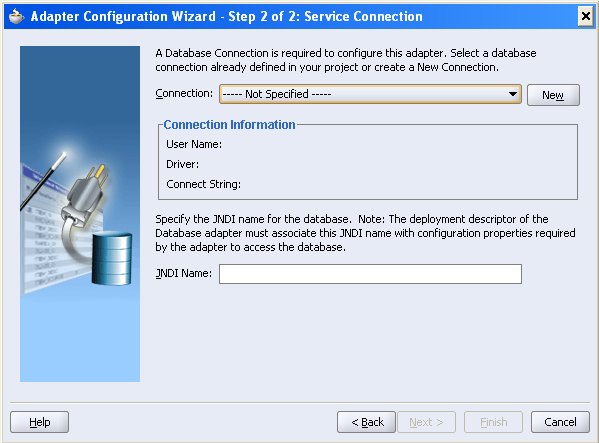
16. Create database connection wizard comes up and it prompts you to put the connection name. Put your
preferred name and select the driver of your choice. I selected ‘Oracle(JDBC)’.
preferred name and select the driver of your choice. I selected ‘Oracle(JDBC)’.
It will then ask you to put the schema user id and pwd. Put your schema credentials and click next (If your
schema is not a sysdba then leave the role field blank).
schema is not a sysdba then leave the role field blank).
Give your DB details (You can get all these from your very old tnsnames.ora file). Select a driver of your cloice. I
selected ‘thin’. Click next after filling Hostname (DB server hostname), JDBC port (DB server port) and
either of your SID or service name.
selected ‘thin’. Click next after filling Hostname (DB server hostname), JDBC port (DB server port) and
either of your SID or service name.
Test the connection, then click on Next and then on finish.
You will see that the JNDI Name (which is blank in the above screenshot) is automatically populated. Click on
the Next button.
the Next button.
17. You will now be prompted to select a DB operation which you intend to perform. I selected Insert on a table.
Click on Next

18. Click on Import tables button and then select the table in which you intend to insert. Click on OK. The
selected table will come on the Adapter configuration wizard. Click Next now.
selected table will come on the Adapter configuration wizard. Click Next now.

19. Select the column in the next step and again click next. Since we do not intend to define any relationships so
we again click next and then click finish
we again click next and then click finish

20. We are then prompted with the following sweet and short ‘Create partner link’ popup with all the necessary
things in it. Click OK
things in it. Click OK

21. Take your pointer to the right side of the invoke activity and click on the arrow at its right side. Drag the arrow all the way to the newly created external database adapter service

22. You will now get a popup inviting you to put the input variable. This input variable is sent by the invoke activity to the DB service. Give it the name which you prefer. And click OK. You will see that the error has disappeared now.

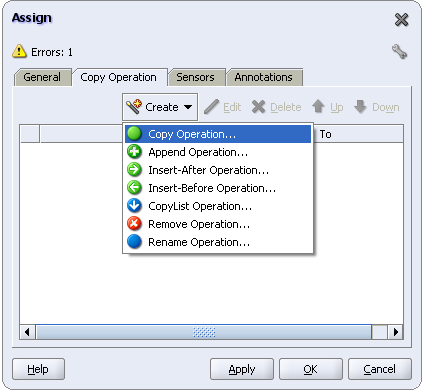
23. We now have to initialize a value to the newly created input variable. Since we are not expecting to catch any output from the service so we keep the output variable blank. To initialize this variable, we have to drag the Assign activity just like we dragged the invoke activity and place it over the invoke activity

24. Double click the assign activity and select Copy operation
25. Change the type from variable to expression

26. Put a string in single quotes in the ‘From’ side of the wizard. I have put ‘Success’ here. On the right hand side drill the hierarchy of the variable you created in the invoke activity to the lowest point and select the thing which appears lowest in the hierarchy. Click on Ok in the Create Copy Operation wizard and on the Assign activity wizard. inputVariable defines the input to the final web service which we are creating and outputVariable stores the output of the same. These are created at the time of creation of the project.

27. At this point our BPEL composite is complete and is ready for deployment. We now need a connection to the application server where we can deploy. We will also need an integration server connection. Click on the connection navigator next to the application navigator on the left hand side in Jdeveloper. Right click on connections and select New Integration Server Connection…
Create Integration Server Connection wizard opens up. Give a name to the connection and click next.

28. You will need an app server connection at this point. I have the AppServerConn here (I have shaded my hostname but it will appear once your app server connection is selected). If you do not have an app server conn then click on the green colored + sign next to application server (As shown in the screenshot below)

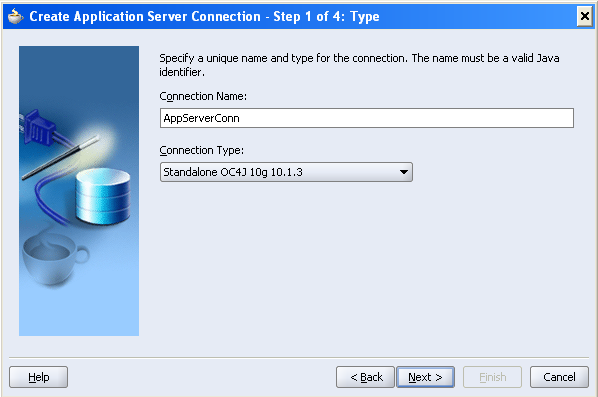
29. A user friendly wizard guides you to create an app server conn. It prompts you for a name and a conn type. I am using Oracle application server(OAS) and my connection type is Standalone OC4J 10G 10.1.3
Click on next. It will prompt you for an app server user id and pwd (oc4j credentials in case of OAS, normally oc4jadmin). Give the same and click next
30. At this point you will be required to give RMI details. Host name here is your server ip or hostname where your web server is installed. Leave the URL path blank.
You will have to contact your system administrator to get the RMI port details. In case you have an access to the enterprise manager(em) of your OAS, you can find it out by doing the following steps
a. Login to em
b. Click on the OC4J instance where you intend to deploy the BPEL composite. I selected ‘home’.

c. Click on Administration

d. Click on the link next to server properties

e. You can see a range of port values. Put the 1st value in your Jdeveloper create application server connection wizard. I have hid the values of my server

31. Test the connection and click on finish.
32. Click on the Application Navigator tab. Right click the project created under the newly created application and go to deploy. Select the newly created integration server connection to deploy the application

33. You will see the following message once your sweet application is deployed. You will obviously see the server on which the application is deployed. I have hid this :)

34. Go to your server’s BPEL console. You should be able to see the deployed BPEL process. If you don’t, then try selecting the domain in which you deployed from the domain drop(labeled ‘jump to’) down in the top right corner of your browser

35. Click on this BPEL process. At this point you can test your BPEL process. Once you click on the process you will be redirected to the below page

36. Since we haven’t put anything for output so we will not be able to see anything here but we can confirm the working by checking the table in which we inserted the data. Honestly, we have hardcoded the string in the copy operation, so we will only get ‘Success’ in the table irrespective of what we put in the input of this form
37. Below are the screenshots showing the data in the table, before and after clicking on the ‘Post XML Message’ button on the BPEL console


38. We can check how our process got executed by clicking on Visual flow but we are least bothered to do that. We have to integrate this with APEX. To do this we have to frame an xml soap envelope.
But there is an easy way out for this too. Click on the back button of your browser so that you return to the HTML form with ‘Post XML Message’ button.

39. Click on the XML source radio button and an XML is generated for you which can be used.

40. Now all we have to do is to put this XML in a pl sql function and call this function from a process of APEX. I assume that the readers of this already know on how to do this.
I will share with you the structure of the function that can call this webservice and here it is
Let me tell you the places where you can find the necessary values to make the soap call to the newly created webservice
a. l_ws_action is the Operation in the above screenshot i.e. ‘initiate’
b. l_web_services_url can be found out by clicking on the WSDL link in the above screenshot and selecting the end point url
c. l_soap_envelope is the xml which we got in the above step
DECLARE
l_soap_envelope VARCHAR2 (4000)
:= '<soap:Envelope xmlns:soap="http://schemas.xmlsoap.org/soap/envelope/">
<soap:Header/>
<soap:Body xmlns:ns1="http://xmlns.oracle.com/BPELProcess1">
<ns1:BPELProcess1ProcessRequest>
<ns1:input></ns1:input>
</ns1:BPELProcess1ProcessRequest>
</soap:Body>
</soap:Envelope>';
l_http_req UTL_HTTP.req;
l_http_resp UTL_HTTP.resp;
l_soap_respond VARCHAR2 (3000);
l_web_services_url VARCHAR2 (200)
:= 'http://yourwebserver:yourwebserverport/orabpel/domainInWhichYouHaveDeployed/nameOfYourBPELProcess/BPELProcessVersionNumber ';
l_ws_action VARCHAR2 (100) := 'initiate';
BEGIN
l_http_req :=
UTL_HTTP.begin_request (TRIM (l_web_services_url), 'POST', 'HTTP/1.1');
------------------------------------------
-- Setting Parameters for UTL_HTTP API
------------------------------------------
UTL_HTTP.set_header (l_http_req, 'Content-Type', 'text/xml');
UTL_HTTP.set_header (l_http_req,
'Content-Length',
LENGTH (l_soap_envelope)
);
UTL_HTTP.set_header (l_http_req, 'SOAPAction', l_ws_action);
UTL_HTTP.write_text (l_http_req, l_soap_envelope);
--------------------------------
-- Getting the Response
--------------------------------
l_http_resp := UTL_HTTP.get_response (l_http_req);
UTL_HTTP.read_text (l_http_resp, l_soap_respond);
--------------------------------
-- Closing the HTTP Request
--------------------------------
UTL_HTTP.end_response (l_http_resp);
EXCEPTION
WHEN UTL_HTTP.end_of_body
THEN
UTL_HTTP.end_response (l_http_resp);
DBMS_OUTPUT.put_line ('SOAP error:' || SQLERRM);
WHEN OTHERS
THEN
DBMS_OUTPUT.put_line ('Other errors:' || SQLERRM);
DBMS_OUTPUT.put_line ('Other errors:' || l_soap_respond);
END;
No comments:
Post a Comment