We will create a new security realm and configure the default
authenticator as well as the AD authenticator. Configuring 2 authentication providers will ensure
that users such as weblogic continue to function (since they will be
authenticated by the default authenticator) and users from the AD are also able
to login (authenticated by the AD authentication provider). We will mark both
the authentication providers as ‘sufficient’. This will ensure that a valid
OBIEE session is created if any of the authentication provider successfully
authenticates the user.
Weblogic servers (admin and managed) use the default security realm
while booting. Creation of a separate security realm gives us the chance to
test the configuration before making it the default realm. This will ensure that we
are not in huge trouble even if we don’t set the right configuration as
weblogic servers can still boot using the myrealm security realm after minimal config changes.
Now, we need the default authenticator and AD authenticator in our new security
realm. The quickest way to configure the default authenticator is to edit the config.xml file at
<BI_HOME>/user_projects/domains/bifoundation_domain/config
Take a backup of
config.xml before you edit this file.
You will see the following in this file.
<realm>
<sec:authentication-provider xsi:type="wls:default-authenticatorType">
<wls:use-retrieved-user-name-as-principal>true</wls:use-retrieved-user-name-as-principal>
</sec:authentication-provider>
<sec:authentication-provider
xsi:type="wls:default-identity-asserterType">
<sec:active-type>AuthenticatedUser</sec:active-type>
</sec:authentication-provider>
<sec:role-mapper
xmlns:xac="http://xmlns.oracle.com/weblogic/security/xacml"
xsi:type="xac:xacml-role-mapperType"></sec:role-mapper>
<sec:authorizer
xmlns:xac="http://xmlns.oracle.com/weblogic/security/xacml"
xsi:type="xac:xacml-authorizerType"></sec:authorizer>
<sec:adjudicator
xsi:type="wls:default-adjudicatorType"></sec:adjudicator>
<sec:credential-mapper
xsi:type="wls:default-credential-mapperType"></sec:credential-mapper>
<sec:cert-path-provider
xsi:type="wls:web-logic-cert-path-providerType"></sec:cert-path-provider>
<sec:cert-path-builder>WebLogicCertPathProvider</sec:cert-path-builder>
<sec:name>myrealm</sec:name>
<sec:password-validator
xmlns:pas="http://xmlns.oracle.com/weblogic/security/providers/passwordvalidator"
xsi:type="pas:system-password-validatorType">
<sec:name>SystemPasswordValidator</sec:name>
<pas:min-password-length>8</pas:min-password-length>
<pas:min-numeric-or-special-characters>1</pas:min-numeric-or-special-characters>
</sec:password-validator>
</realm>
Copy everything from <realm> to </realm>, paste
it under the realm tag and change <sec:name>myrealm</sec:name>
in the copied code to
<sec:name>advanced_realm</sec:name>.
The final config.xml file should have a structure like the following.
<realm>
<sec:authentication-provider
xsi:type="wls:default-authenticatorType">
<wls:use-retrieved-user-name-as-principal>true</wls:use-retrieved-user-name-as-principal>
</sec:authentication-provider>
<sec:authentication-provider
xsi:type="wls:default-identity-asserterType">
<sec:active-type>AuthenticatedUser</sec:active-type>
</sec:authentication-provider>
<sec:role-mapper
xmlns:xac="http://xmlns.oracle.com/weblogic/security/xacml"
xsi:type="xac:xacml-role-mapperType"></sec:role-mapper>
<sec:authorizer
xmlns:xac="http://xmlns.oracle.com/weblogic/security/xacml"
xsi:type="xac:xacml-authorizerType"></sec:authorizer>
<sec:adjudicator
xsi:type="wls:default-adjudicatorType"></sec:adjudicator>
<sec:credential-mapper
xsi:type="wls:default-credential-mapperType"></sec:credential-mapper>
<sec:cert-path-provider
xsi:type="wls:web-logic-cert-path-providerType"></sec:cert-path-provider>
<sec:cert-path-builder>WebLogicCertPathProvider</sec:cert-path-builder>
<sec:name>myrealm</sec:name>
<sec:password-validator
xmlns:pas="http://xmlns.oracle.com/weblogic/security/providers/passwordvalidator"
xsi:type="pas:system-password-validatorType">
<sec:name>SystemPasswordValidator</sec:name>
<pas:min-password-length>8</pas:min-password-length>
<pas:min-numeric-or-special-characters>1</pas:min-numeric-or-special-characters>
</sec:password-validator>
</realm>
<realm>
<sec:authentication-provider
xsi:type="wls:default-authenticatorType">
<wls:use-retrieved-user-name-as-principal>true</wls:use-retrieved-user-name-as-principal>
</sec:authentication-provider>
<sec:authentication-provider
xsi:type="wls:default-identity-asserterType">
<sec:active-type>AuthenticatedUser</sec:active-type>
</sec:authentication-provider>
<sec:role-mapper
xmlns:xac="http://xmlns.oracle.com/weblogic/security/xacml"
xsi:type="xac:xacml-role-mapperType"></sec:role-mapper>
<sec:authorizer
xmlns:xac="http://xmlns.oracle.com/weblogic/security/xacml"
xsi:type="xac:xacml-authorizerType"></sec:authorizer>
<sec:adjudicator xsi:type="wls:default-adjudicatorType"></sec:adjudicator>
<sec:credential-mapper
xsi:type="wls:default-credential-mapperType"></sec:credential-mapper>
<sec:cert-path-provider
xsi:type="wls:web-logic-cert-path-providerType"></sec:cert-path-provider>
<sec:cert-path-builder>WebLogicCertPathProvider</sec:cert-path-builder>
<sec:name>advanced_realm</sec:name>
<sec:password-validator
xmlns:pas="http://xmlns.oracle.com/weblogic/security/providers/passwordvalidator"
xsi:type="pas:system-password-validatorType">
<sec:name>SystemPasswordValidator</sec:name>
<pas:min-password-length>8</pas:min-password-length>
<pas:min-numeric-or-special-characters>1</pas:min-numeric-or-special-characters>
</sec:password-validator>
</realm>
Save the file. This coping operation will create a new security realm for us called advanced_realm. The configuration of this new realm will match the configuration of myrealm.
Stop the managed server , system components from EM and then
admin server in the same order. Start the admin server. You should be able to
see a new realm called advanced_realm with the default authenticator already
configured in it. This is because we have already copied all the configurations of myrealm in the new realm. Note that you can give any name instead of ‘advanced_realm’. You just have to mention it in config.xml file.

We now have to configure the AD.
1.
Click on the advanced_realm link.
2.
Go to Users and Groups tab and then under Users
tab. User weblogic and all other users maintained in the embedded LDAP of weblogic
should be visible. Similarly click on the Groups tab and validate that all the
out of the box groups are present in the new realm. This should include groups
such as BIAdministrators.

3.
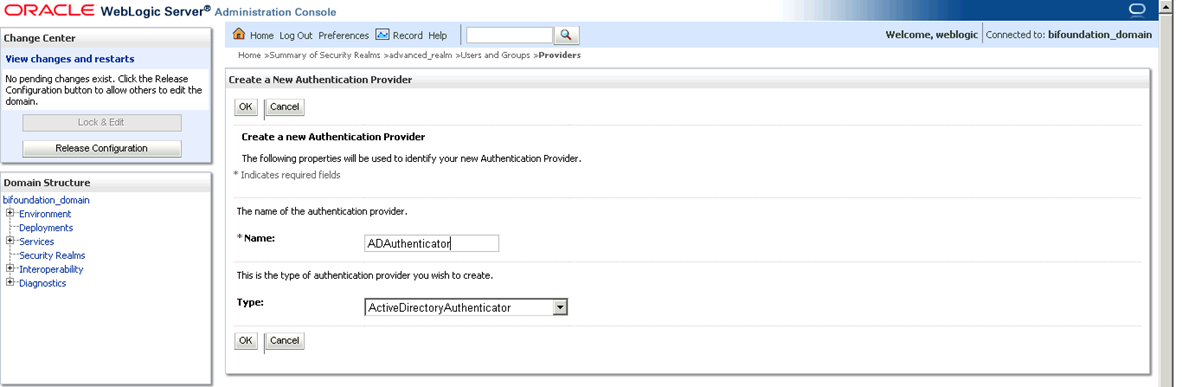
Click on the Providers tab, then click on Lock & Edit button on the top left and finally on the New button to create a new
authentication provider. This new provider will be for our AD.
4.
Give it any name of your choice and select ActiveDirectoryAuthenticator
in the Type dropdown. Selecting the type helps weblogic present to you the
values that will have to be configured for the selected type of authenticator.
Since we are using AD, we chose ActiveDirectoryAuthenticator in the Type
dropdown.
5. Click on the newly created Authenticator, set
the Control Flag to SUFFICIENT in the Common tab and hit the Save button. This
will ensure that a valid OBIEE session is created as soon as a user is
authenticated by the newly created provider. This authenticator will be
‘Sufficient’ for a session to be created. Make sure that you set the Control Flag for the Default Authenticator also to SUFFICIENT.

6.
Click on the Provider Specific tab
The following information will be required
in this tab.
i.
Host
ii.
Port
iii.
Prinipal
iv.
Credential
v.
User Base DN
vi.
All Users Filter
vii.
User From Name Filter
viii.
User Name Attribute
ix.
User Object Class
x.
Group Base DN
xi.
All Groups Filter
xii.
Group From Name Filter
xiii.
Static Group Name Attribute
xiv.
Static Group Object Class
xv.
Static Member DN Attribute
xvi.
Static Group DNs from Member DN Filter
Let us understand the process of gathering this info.
Host, port and the principal_user+credential(password)
should be with you if you have an Active Directory. You should also have a tool
such as Active Directory Explorer to help you get the above values.
a.
Enter your <host>:<port> (in Connect
to text box) and the principal_user credentials in Active Directory Explorer.
Put the host and port in the Provider Specific tab in weblogic console
too.
b.
Principal: This is the Distinguished Name (DN)
of the LDAP user that WebLogic Server should use to connect to the LDAP server.
Check the AD Explorer and navigate to the path in which this principal user
exists.
Click on the user and you will get an attribute called DN on the right
hand side. Put this in the Principal text box of weblogic and put its
corresponding credentials in the credentials text box. The value of this DN
will be similar to the following.
CN=<user name>,OU=Secured,OU=Accounts,DC=<something>,DC=com,DC=au
c.
User Base DN: Search for a typical user in AD
Explorer and get his DN. The DN will start with
CN=<some_value>,OU=<some_big_string>
Remove CN=<some_value>, (including semicolon) and paste the rest in
the User Base DN text box.
OU=General,OU=Accounts,DC=<something..>,DC=com,DC=au
d.
All Users Filter: This will be used to search the AD users from
fusion middleware. The syntax is of the following format.
(&(sAMAccountName=*)(objectclass=user))
Go back to the AD Explorer and see the attribute name which stores the
user id of the AD users. This is mostly sAMAccountName.
The same page in AD Explorer will also list the value in objectclass attribute. Typical value is user. Hence put the above string in the All Users Filter.
e.
User From Name Filter: This will be used when we
try to search for a single AD user from weblogic. The typical structure is:
(&(sAMAccountName=%u)(objectclass=user))
There is subtle difference between this and point (d). Point (d) gets all
users from AD, this one searches for a single user of interest.
f.
User Name Attribute: This is the attribute that
holds the user id in AD. Typical value is sAMAccountName.
g.
User object class can also be found out by
browsing to a typical user using AD Explorer and then checking out the objectclass attribute. Typical value is
user.
h.
Follow a similar method to get the groups info form
AD Explorer. Typical value are pasted below:
Group Base DN:OU=Groups,OU=Groups,DC=<something>,DC=com,DC=au
All Groups Filter:(&(sAMAccountName=*)(objectclass=group))
Group From Name Filter:(&(sAMAccountName=%g)(objectclass=group))
Static Group Name Attribute:sAMAccountName
Static Group Object Class:group
Static Member DN Attribute:member
Static Group DNs from Member DN
Filter:(&(member=%M)(objectclass=group))
2.
Change the Control Flag of the
DefaultAuthenticator under Providers tab to SUFFICIENT.
3.
Save this by hitting the Save button and then
hit the Activate Changes button. Stop the managed server, Stop all BI System
components from EM and then restart the Admin server. Note that the default
realm is still myrealm and it has not been altered. Even if you haven’t
configured your provider correctly, you should still be able to restart the
admin server since your new realm isn’t the default realm.
4.
We will now test our configuration.
a.
Click on your newly created security realm ->
Users and Groups and you should be able to see all your AD users in list.
b.
Click on Customize this table link. Search for a AD user in the Criteria text box and hit the apply button. You should get your
user.
c.
Click on this user and then on the Groups tab.
You should be able to see a list of groups associated with this user in the AD.
d.
Click again on the Users and Groups tab then on
Groups sub tab. You should be able to see all AD groups.
e.
Search for weblogic user and make sure that it
has both Administrators and BIAdministrators groups assigned to it. If they are
not assigned then assign the same and save it.
5.
If all the above tests pass, then our config changes in console are correct and we are all set
to change our default realm. Go to <your domain> -> Security. Click on
Lock & Edit button and switch the default realm. Save and activate the
changes. Restart the admin server. Note that since we had created a separate
realm, we are safe even if our admin server does not start. We can edit the default-realm tag in <BI_HOME>/user_projects/domains/bifoundation_domain/config/config.xml and set it to myrealm if the admin server does not start with the new realm.
By this time, you are all set with your new security realm,
your admin server is up and the users and groups from your AD are visible in
your console. The final step is to map these users and groups to your OBIEE
roles. Once this is done, all the users authenticated by your new security
realm will be able to log in to OBIEE. The privileges of these OBIEE users will
depend on the roles assigned to these users and groups. Assigning of the roles
is done in the EM. Let us log in to the EM.
Go to the security provider configuration in EM and then click on the configure button under Identity Store Provider … section. Add the following 3 properties as shown below.
user.login.attr
|
sAMAccountName
|
username.attr
|
sAMAccountName
|
virtualize
|
true
|
Use the below screenshots for help.


Note that sAMAccountName matches with my AD. You should pick the attirbute based on your AD config.
6.
Hit the OK button and then restart your Admin
server. Your managed server and system components would already be down at this
point because you had brought them down above.
Go to Application Roles as shown below.

For the purpose of this discussion, we will talk about
assigning BIConsumer role to users in an AD
group called ‘Cirtix Users’. The result of this will be that any user
who is assigned ‘Citrix Users’ group in the AD will get the rights of defined
in BIConsumer role.
Follow the following 4 screenshots to achieve this.


Add the group and hit the OK button. If you try to add a
user though, you might face the following situation where the Principal is
null and you are not able to add the user as shown below.
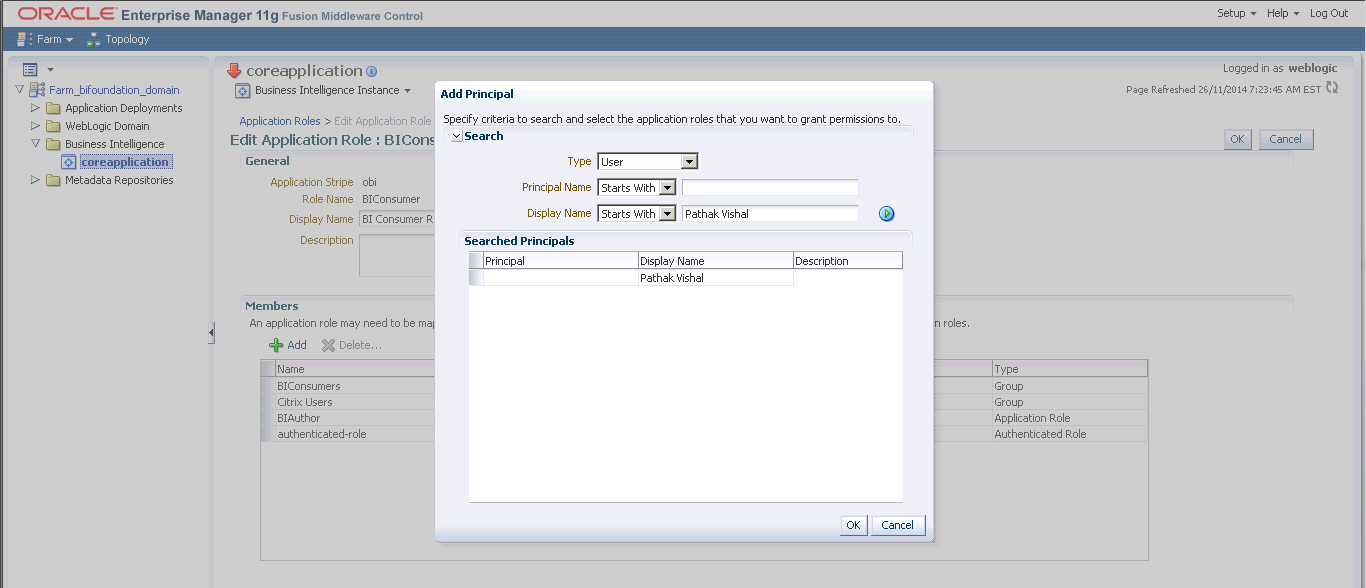
If this happens then delete the
virtualize=true property which you have set in step 1 above. You will also have
to reorder the authentication providers in the security realms in the console
such that ADAuthenticator is the first authenticator and restart the admin
server. You will then be able to add the user to the role but then after you
have added the user, set the virtualize=true property again and restart the
admin server. virtualize=true property is necessary because we are using 2
authentication providers (AD and the out of the box DefaultAuthenticator).
At this point, you are all set to start your managed server
and then your System components. If your managed server does not start for weblogic.security.SecurityInitializationException:
Authentication for user weblogic denied then change the name of
<BI_Home>/user_projects/domains/bifoundation_domain/servers/bi_server1/data/ldap
directory to something else (This can be any name. We just want the server to create a new ldap directory while booting and we dont want to lose this directory as well) and then start the managed server again.
That’s it. You should be able to login using weblogic as
always and the users defined in AD should also be able to login.
1 comment:
Great article, thankyou
For 11.1.1.9 be aware there is a bug - see Doc 2016571 and Patch 20188679
Cheers
RT
Post a Comment