| Tweet |
We know that EM can be used for deployment but we had a requirement to maintain an automated log every time a deployment is done with mandatory comments from the developer and link the deployment to a backed up RPD so that we can keep a track of the changes been done to the RPD and revert back if necessary.
I developed the Multi User DEPLOYMENT (not Development) tunnel a.k.a neo-MUD tunnel utility to meet this requirement. We will talk about the process to implement the neo-MUD tunnel in this blog.
Let me first jot down the advantages of this tunnel.
Advantages:
1. Comments made mandatory. Moreover, a developer putting bogus comments or insufficient comments can easily be identified.
2. EM access is not required for the deployments. So developers can have Author privileges in higher environments that require frequent deployments (such as SIT) and still be able to do the deployments without any hassle to the admins.
3. Deployment by multiple developers is possible while ensuring that only one can deploy at a time.
4. Easy roll backs are facilitated by a log maintained at the server side which has an entry of
a. The user who requested for the deployment
b. The comment
c. The date and the time at which the deployment was initiated
d. The backup file name for the deployment
5. Reliable deployment log since it exists on the server side and cannot be tampered by any developer.
6. No server mount point space issues because the utility can back up the files on an external mount point.
Deployments done through em are backed up on the server in bifoundation/OracleBIServerComponent/coreapplication_obis1/repository directory that can create space issues after some deployments.
Before we go into the implementation, please take a backup of the folder that contains all your repositories (bifoundation/OracleBIServerComponent/coreapplication_obis1/repository) and also your bin folder that contains opmnctl. This is because we are touching these 2 directories and if you accidentally delete any of these during your script building/testing then you should have a backup.
The neo-MUD tunnel consists of 3 parts.
1. The driver: A batch script to drive the deployment.
2. The executioner: A shell script to execute the task.
3. The encapsulating trigger: An encapsulating executable created on top of the driver script to give a trigger to the users a.k.a the developers to start the deployment.
Before we go any further, please note that this code is based on top of the OBIEE VM provided by Oracle. However, this system can be used for any unix/linux based server.
Let us now talk about the driver.
The driver:
The driver performs the following functions.
a. Sends the user name of the developer, the date and time of the request and the developer comment for deployment to the executioner.
b. Sends the RPD to be deployed to the executioner.
c. Pulls the deployment log from the server and removes it from the server.
The executioner:
The primary job of the executioner is to deploy the RPD.
Note that a different flavor of the executioner based on jython script is available online. One such resource is http://www.oracle.com/technetwork/issue-archive/2011/11-nov/o61bi-486594.html
Let me list the functions performed by the executioner proposed in this blog.
a. Validates conditions such as non availability of the RPD to be deployed, non availability of the developer comments and an in-progress deployment. Please note that the comments in this utility can only be single line comments i.e. new line character is not allowed.
b. Finds the currently online RPD (latest RPD in the system).
c. Backs-up the currently online RPD.
d. Makes an entry in the log file for the deployment.
e. Creates a log file with the steps executed for the deployment which is sent back to the user requesting the deployment.
f. Deploys the RPD and starts the server.
The encapsulating trigger.
This is an executable that the developer can click to fire the driver and start the deployment process. We will create this using IEXPRESS feature of windows.
Let us now see the code.
The Driver(neo-MUD.bat):
Prerequisites:
1. You should have putty's pscp and plink utilities. The pscp and plink utilities should be copied in the same directory in which the Driver script exists. I am calling this directory neo-MUD and I have created this on the desktop.
Comments.txt should also exist in the same directory in which the Driver script exists i.e. neo-MUD.
2. Create a RPD_deployment_folder directory on the server. In the example below, the directory has been created in /home/oracle/Desktop directory of the VM.
3. The RPD_deployment_script.sh will live in RPD_deployment_folder. These names have been hard coded in the driver below.
4. The RPD to be deployed should be called OBIEE.rpd. So rename your RPD to OBIEE.RPD and then put it in the noe-MUD folder. If you want, you can parameterize this part.
5. Please run the pscp and plink scripts separately first. This helps in testing the scripts and will let you make key entries in the cache which the script might prompt you on the 1st execution.
6. You should have the backup folder already configured. The backup folder is used in the executioner part of the utility. The backup folder used in this blog is /media/sf_Blog/neoMUDTunnel/Backup. More details about the configuration of the backup folder can be found towards the end of this blog.
The code for the driver (neo-MUD.bat):
The explanation for the Driver (neo-MUD.bat)set /p Comments=<C:\Users\Vishal\Desktop\neo-MUD\Comments.txt set Comments_for_unix=%Comments: =~% set date_and_time=%date%_%time% set date_and_time_for_unix=%date_and_time::=_% set date_and_time_for_unix=%date_and_time_for_unix: =_% set date_and_time_for_unix=%date_and_time_for_unix:/=_% set date_and_time_for_unix=%date_and_time_for_unix:.=_% break>C:\Users\Vishal\Desktop\neo-MUD\Comments.txt C:\Users\Vishal\Desktop\neo-MUD\pscp -pw Admin123 C:\Users\Vishal\Desktop\neo-MUD\OBIEE.rpd oracle@demo.us.oracle.com:/home/oracle/Desktop/RPD_deployment_folder C:\Users\Vishal\Desktop\neo-MUD\plink -pw Admin123 oracle@demo.us.oracle.com "/home/oracle/Desktop/RPD_deployment_folder/RPD_deployment_script.sh" %Username% %Comments_for_unix% %date_and_time_for_unix% C:\Users\Vishal\Desktop\neo-MUD\pscp -pw Admin123 oracle@demo.us.oracle.com:/home/oracle/Desktop/RPD_deployment_folder/deployment_log%date_and_time_for_unix%.txt C:\Users\Vishal\Desktop\neo-MUD C:\Users\Vishal\Desktop\neo-MUD\plink -pw Admin123 oracle@demo.us.oracle.com "rm /home/oracle/Desktop/RPD_deployment_folder/deployment_log%date_and_time_for_unix%.txt"
Note that I am using demo.us.oracle.com as the linux server name. For this to work, you will have to put an entry in the etc/hosts file on your client (windows machine) for your server as shown below.
Note that if your VM is configured to pull a dynamic IP everytime it starts, then you will have to edit the hosts file after every start of the VM. If the IP address of your VM is not matching the IP next to demo.us.oracle.com then your utility will not work.
Now the explanation of the code above.
1. We first read the comments from the comments file and then put the comments in the Comments_for_unix variable. We set the value to =~ if the user does not enter the comment. We will use =~ to make a comparison in the executioner script and terminate the execution if =~ has been passed. We do this because we want the developer to definitely enter the comment.
2. We pick the date and time from the windows box and format it in a way we want in the unix box.
3. We then delete the comments from the Comments.txt file using the break command.
4. We call the pscp utility of putty to put the RPD to be deployed on the RPD_deployment_folder of the server.
5. We then call the plink utility to execute the RPD_deployment_script.sh script. We pass Username, Comments_for_unix and date_and_time_for_unix as the 1st 2nd and 3rd arguments to the RPD_deployment_script.sh script. The value passed in the Username variable is the name of the user logged into the windows machine. The user name of the developer requesting the deployment does not have to be passed explicitly. Automated passing of the username helps in protecting the sanctity of the deployment log on the server side.
6. After the execution of RPD_deployment_script.sh, we move the deployment log generated for this deployment on the server side to the client side.
7. We delete the deployment log of this deployment from the server side.
The Executioner (RPD_deployment_script.sh):
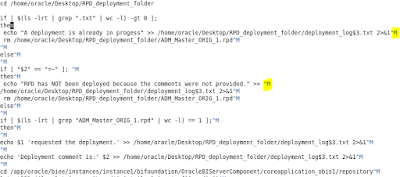
The Executioner Code:
cd /home/oracle/Desktop/RPD_deployment_folder

if [ $(ls -lrt | grep ".txt" | wc -l) -gt 0 ];
then
 echo "A deployment is already in progess" >> /home/oracle/Desktop/RPD_deployment_folder/deployment_log$3.txt 2>&1
 rm /home/oracle/Desktop/RPD_deployment_folder/OBIEE.rpd

else

if [ "$2" == "=~" ];
then
 echo "RPD has NOT been deployed because the comments were not provided." >> /home/oracle/Desktop/RPD_deployment_folder/deployment_log$3.txt 2>&1
 rm /home/oracle/Desktop/RPD_deployment_folder/OBIEE.rpd
else

if [ $(ls -lrt | grep "OBIEE.rpd" | wc -l) == 1 ];
then

echo $1 'requested the deployment.' >> /home/oracle/Desktop/RPD_deployment_folder/deployment_log$3.txt 2>&1

echo 'Deployment comment is:' $2 >> /home/oracle/Desktop/RPD_deployment_folder/deployment_log$3.txt 2>&1

cd /app/oracle/biee/instances/instance1/bifoundation/OracleBIServerComponent/coreapplication_obis1/repository
latestRPD=$(ls -rt | grep "\.rpd$" | tail -1)
echo $latestRPD 'is the latest RPD.'>> /home/oracle/Desktop/RPD_deployment_folder/deployment_log$3.txt 2>&1

cd /media/sf_Blog/neoMUDTunnel/Backup
latestBackupNumber=$(ls -rt | grep "\.rpd$" | tail -1 | cut -f2 -d".")
if [ -z "$latestBackupNumber" ];
then
 newFileNumber=1
else
 newFileNumber=$(($latestBackupNumber + 1))
fi
echo $newFileNumber 'is the new backup file number.' >> /home/oracle/Desktop/RPD_deployment_folder/deployment_log$3.txt 2>&1

echo $1,$2,$3,SIT.$newFileNumber.rpd >> "/home/oracle/Desktop/RPD_deployment_folder/Deployment log.csv" 2>&1
echo 'Deployment log has been updated.' >> /home/oracle/Desktop/RPD_deployment_folder/deployment_log$3.txt 2>&1

cd /home/oracle/Desktop/RPD_deployment_folder
mv ./OBIEE.rpd ./$latestRPD
echo 'Got the file and renamed it.' >> /home/oracle/Desktop/RPD_deployment_folder/deployment_log$3.txt 2>&1

cd  /app/oracle/biee/instances/instance1/bin
echo 'Moved to the work area to stop the service.' >> /home/oracle/Desktop/RPD_deployment_folder/deployment_log$3.txt 2>&1
./opmnctl stopproc ias-component=coreapplication_obis1 >> /home/oracle/Desktop/RPD_deployment_folder/deployment_log$3.txt 2>&1
echo 'Service has been stopped.' >> /home/oracle/Desktop/RPD_deployment_folder/deployment_log$3.txt 2>&1

mv /app/oracle/biee/instances/instance1/bifoundation/OracleBIServerComponent/coreapplication_obis1/repository/$latestRPD /media/sf_Blog/neoMUDTunnel/Backup/SIT.$newFileNumber.rpd
echo 'Moved the currect RPD to backup folder.' >> /home/oracle/Desktop/RPD_deployment_folder/deployment_log$3.txt 2>&1

mv /home/oracle/Desktop/RPD_deployment_folder/$latestRPD /app/oracle/biee/instances/instance1/bifoundation/OracleBIServerComponent/coreapplication_obis1/repository
echo 'Moved the RPD to be deployed. Starting Server.' >> /home/oracle/Desktop/RPD_deployment_folder/deployment_log$3.txt 2>&1
./opmnctl startproc ias-component=coreapplication_obis1 >> /home/oracle/Desktop/RPD_deployment_folder/deployment_log$3.txt 2>&1
echo 'Server started.' >> /home/oracle/Desktop/RPD_deployment_folder/deployment_log$3.txt 2>&1

else
 echo "RPD has NOT been deployed because OBIEE.rpd was not found in neo-MUD Folder." >> /home/oracle/Desktop/RPD_deployment_folder/deployment_log$3.txt 2>&1
fi

fi

fi

exit
Note that when you copy this code from windows to linux, some special characters might creep in. You will have to then open the file in vi editor and remove these special characters.Also note that coping the code might lead to wrapping of the code text. This might show up as errors while execution.
Let us now talk about each statement of this code.
1. We first go to RPD_deployment_folder using cd command.
2. We then check whether a txt file already exists in RPD_deployment_folder using if [ $(ls -lrt | grep ".txt" | wc -l) -gt 0 ];
If it exists then it means that some other developer has already started the deployment. If we find a txt file then we put the message that A deployment is already in progess into a log file and remove the RPD from the server that has been put as a result of this instance of deployment and exit.
3. We then check whether the user has provided any comments or not. If the comments have not been provider then the default value of =~ will have been passed. So we compare against =~ and if we find just =~, we return after putting a message in the log file that RPD has NOT been deployed because the comments were not provided.
3. We then check whether OBIEE.rpd has been provided or not. If we don't find the file then we return after putting a message in the log file that RPD has NOT been deployed because OBIEE.rpd was not found in neo-MUD Folder.
4. We find the name of the latest file that exists under /app/oracle/biee/instances/instance1/bifoundation/OracleBIServerComponent/coreapplication_obis1/repository.
We find this using ls -rt | grep "\.rpd$" | tail -1. We feed this value to latestRPD variable.
5. We then go to the backup folder and search for the latest RPD number in it. We store the backup RPDs in the SIT.<backup_number>.rpd format. For example, the backup file for the 2nd deployment will be SIT.2.rpd
We add 1 to the latest number to generate the backup file name for the current deployment.
We have a case statement to find out if the deployment is the 1st deployment. In case of the 1st deployment, we will not find any backup files. For the 1st deployment we assign the number 1 for the backup file name.
We put the backup file number in newFileNumber variable.
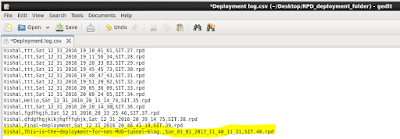
6. We put the user who requested for the deployment, the comment, the date and the time at which the deployment was initiated and the backup file name for this deployment in Deployment log.csv file on the server side. This server side log file holds the list of all the deployments and is never accessible to the developer. This server side log file will help in rollback if the development team feels the need to roll back to a deployment before a certain deployment was done. This entry is done using echo $1,$2,$3,SIT.$newFileNumber.rpd >> "/home/oracle/Desktop/RPD_deployment_folder/Deployment log.csv" 2>&1.
7. We now rename OBIEE.rpd to the name of the RPD that is currently online. The name of the RPD that is currently online has already been stored in latestRPD variable.
8. We then stop the server using opmnctl command.
9. We move the current online file to the backup folder using mv command.
10. We then move the file to be deployed into the /app/oracle/biee/instances/instance1/bifoundation/OracleBIServerComponent/coreapplication_obis1/repository directory.
Note that the file to be deployed has already been renamed to the name of the file that was currently online. So the name of the file to be deployed will match with the entry in NQSConfig.ini file.
11. We then start the server using the opmnctl command and exit.
The encapsulating trigger (neo-MUD.exe):
1. Run cmd as Administrator
2. Type iexpress in it and then select Create new Self Extraction Directive file option in it.
2. Select Extract files and run an installation command option.
3. Give any title to the package. This title will appear on the dialog boxes that the user sees. I have called it "neo-MUD".
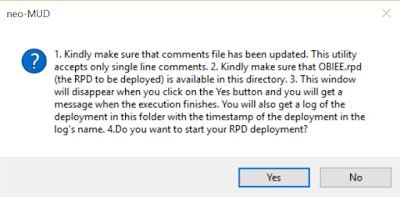
4. Put a prompt in the Confirmation prompt dialog box.
You can either have a simplistic prompt as shown above or have a more descriptive comment as shown below. A descriptive comment helps a new developer understand the process clearly.
1. Kindly make sure that comments file has been updated. This utility accepts only single line comments.
2. Kindly make sure that OBIEE.rpd (the RPD to be deployed) is available in this directory.
3. This window will disappear when you click on the Yes button and you will get a message when the execution finishes. You will also get a log of the deployment in this folder with the timestamp of the deployment in the log's name.
4.Do you want to start your RPD deployment?
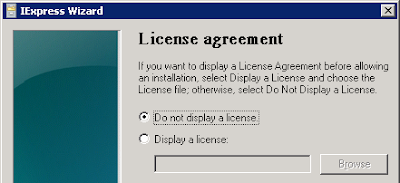
5. Select Do not display license in the License agreement dialog box.
6. Select the bat file that will trigger the deployment. This bat file is The Driver we discussed above.
7. Put cmd /c "neo-MUD.bat" in the Install Program and do not put anything in Post Install Command. Note that the name (neo-MUD.bat) must match the name of your bat file. This command will be used to trigger the file.
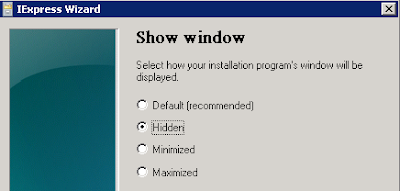
8. Select Hidden in the Show Window dialog box.
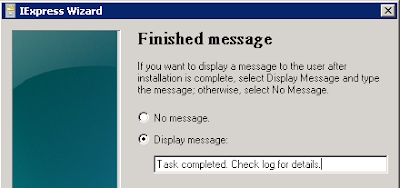
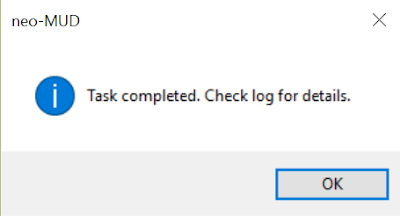
9. Put Task completed. Check log for details. in the Finished message dialog box.
10. Enter the name of the exe file along with its full path. This exe file is the exe form of your bat file. This exe file is our trigger. Put this in the neo-MUD directory. Check both the options on this dialog box.
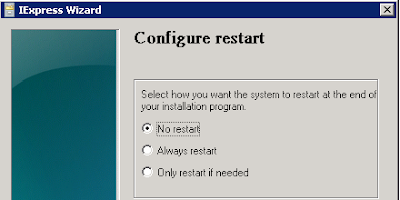
11. Select No restart in the Configure restart dialog box.
12. Specify the full path for the SED file. This file is the complilation of all the options selected by you in IEXPRESS and is used to make your exe file from bat file.
13. Create the package and click Finish.
The following are the configurations in my SED file. You can compare your SED file with mine if you find that something isnt working.
[Version]
Class=IEXPRESS
SEDVersion=3
[Options]
PackagePurpose=InstallApp
ShowInstallProgramWindow=1
HideExtractAnimation=1
UseLongFileName=1
InsideCompressed=0
CAB_FixedSize=0
CAB_ResvCodeSigning=0
RebootMode=N
InstallPrompt=%InstallPrompt%
DisplayLicense=%DisplayLicense%
FinishMessage=%FinishMessage%
TargetName=%TargetName%
FriendlyName=%FriendlyName%
AppLaunched=%AppLaunched%
PostInstallCmd=%PostInstallCmd%
AdminQuietInstCmd=%AdminQuietInstCmd%
UserQuietInstCmd=%UserQuietInstCmd%
SourceFiles=SourceFiles
[Strings]
InstallPrompt=1. Kindly make sure that comments file has been updated. This utility accepts only single line comments. 2. Kindly make sure that OBIEE.rpd (the RPD to be deployed) is available in this directory. 3. This window will disappear when you click on the Yes button and you will get a message when the execution finishes. You will also get a log of the deployment in this folder with the timestamp of the deployment in the log's name. 4.Do you want to start your RPD deployment?
DisplayLicense=
FinishMessage=Task completed. Check log for details.
TargetName=C:\Users\Vishal\Desktop\neo-MUD\neo-MUD.exe
FriendlyName=neo-MUD
AppLaunched=cmd /c "neo-MUD.bat"
PostInstallCmd=<None>
AdminQuietInstCmd=
UserQuietInstCmd=
FILE0="neo-MUD.bat"
[SourceFiles]
SourceFiles0=C:\Users\Vishal\Desktop\neo-MUD\
[SourceFiles0]
%FILE0%=
So now, let us see how this works.
Let me show you how my client side folder (neo-MUD) looks.
My client side folder (neo-MUD) has the following files in it.
1. Comments.txt file - The user will put the comments in this file.
2. neo-MUD.exe - This is the trigger. This file is the output of IEXPRESS. The user executes this file for deployment.
3. OBIEE.rpd - This is the RPD to be deployed.
4. plink.exe - This is an executable from putty. It is used in our bat script. If required, you can hide this file using windows features.
5. pscp.exe - This is an executable from putty. It is used in our bat script. If required, you can hide this file using windows features.
Note that The Driver bat file neo-MUD.bat file is missing from the folder. IEXPRESS bundles the bat file in neo-MUD.exe.
So neo-MUD.bat is not required in the folder. Besides, if the file is kept in this folder, the developers will be able to see the password
of the server.
Let me now show you my server side folder (RPD_deployment_folder)
It has the following files.
1. Deployment log.csv - This is the server side log of all the deployments.
2. RPD_deployment_script.sh - This is the executioner. This script does the heavy lifting of deployment and creating log files.
Let us now see the deployment in action.
1. Double click on The Trigger (neo-MUD.exe). You will get the prompt. The message in the prompt will depend on your entry in step
4 of The encapsulating trigger part. Click on the Yes button to start the deployment.
The window will disappear after you click on the Yes button.
2. You will get the following message after the deployment finishes.
3. You will see a log file with the deployment log in the client side folder (neo-MUD)
4. Open the log file to see detail info about the deployment.
It says that the RPD was not deployed because comments were not provided.
5. So let us now put the comments in the Comments.txt file and double click on the
trigger (neo-MUD.exe) again and wait for the alert of the completion of the deployment.
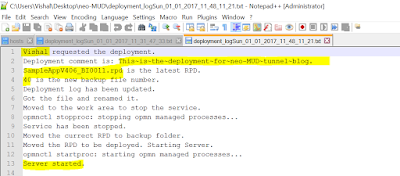
6. We got the alert, now let us check the log generated for this deployment.
7. We see that the log clearly lists the user who requested the deployment, the comment and the backup file number.
It also does not have any errors to be worried about and also says at the end that the server has started.
8. Let us now look at the log on the server side. It has the windows user name of the user who initiated
the deployment, the deployment comment, the time stamp of the deployment and the backup file name
for this deployment.
We see that the backed up file for this deployment is SIT.40.rpd
Check The Executioner script. You will find that we are backing up the RPD on /media/sf_Blog/neoMUDTunnel/Backup.
You can honestly backup on any mount point but the advantage of an external mount point is that it you will not
have server space issues after a bunch of deployments.
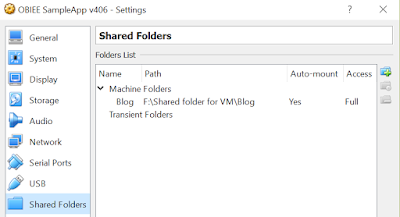
I have configured the shared folder settings of my VM in the following way.
F:\Shared folder for VM\Blog maps to /media/sf_Blog on the VM.
Our backup directory is /media/sf_Blog/neoMUDTunnel/Backup.
So let us go to F:\Shared folder for VM\Blog\neoMUDTunnel\Backup and find our backups.
We see that our backed up RPD i.e. SIT.40.rpd is available in this folder.
So we have our client side log for the developer to know about this deployment, we have a server side
log along with developer comments for keeping a track of all the deployments, we have our backed up
RPD if we want to revert back and our RPD has also been deployed.
Till next time ..












2 comments:
Hi Vishal,
Thank you for a wonderful post. Would it be possible for you to share the Driver, Executioner script for Unix (i.e. with .sh file). Also, how can we use the trigger in Unix machine?
Thanks once again and looking forward for your reply.
Regards
Sanjeet Gupta
I cannot guess why you would want to have the trigger in the unix machine.
The executioner itself is written in a shell script.
The code is available in the blog.
Post a Comment